
WordPress is a widely popular content management system that enables individuals and businesses to quickly build and manage websites.
With its user-friendly interface, extensive plugin ecosystem, and customizable themes, WordPress has become the go-to platform for website owners of all skill levels.
Customer engagement and support are essential for the success of your WordPress website. This is where chatbots come into play. Using chatbots, you can offer instant and automated customer support to website visitors and enhance their experience.
If you want to add a chatbot to your website, Chatling is the best choice. It is a no-code AI chatbot that automatically learns from your WordPress website and provides accurate and personalized responses to your visitors.
The following sections will guide you through integrating Chatling with WordPress.
- What is Chatling?
- How to Add Your Chatling Chatbot to WordPress
- How to Add Your Chatling Chatbot to Elementor
- Step 1: Get Your Chatbot Embed Code
- Step 2: Access the WordPress Dashboard
- Step 3: Add a New Custom Code Snippet
- Step 4: Fill in the Custom Code Details
- Step 5: Paste the Chatbot Embed Code
- Step 6: Configure Display Conditions
- Step 7: Publish Your Chatbot
- Benefits of Chatbots for Wordpress
- Instant Support and Availability
- Efficient and Scalable Customer Support
- Personalized User Experiences
- Improved Lead Generation and Conversion
- Conclusion
What is Chatling?
Chatling is an AI chatbot designed to automatically learn from your website content, knowledge base, documents, and other resources, allowing it to provide accurate and personalized responses to customer inquiries.
By adding Chatling to your WordPress site, you can deliver real-time assistance, address customer queries, and provide interactive support.
Getting up and running with Chatling is easy and takes only a few minutes. Read the next section to find out how to add a chatbot to your WordPress website using Chatling.
How to Add Your Chatling Chatbot to WordPress
This tutorial assumes that you have already created a Chatling account and have set up your chatbot. If you haven’t created an account yet, sign up and follow this guide to build and configure your chatbot.
Method 1: Using a Plugin (Recommended)
This method is the easiest way to add Chatling to your WordPress website, especially if you’re not comfortable editing code. By using a plugin, you can quickly insert the chatbot script without modifying your theme files.
Step 1. Sign In to Your Chatling Account and Access the Embed Code
- Go to Chatling and log in with your credentials.
- From the dashboard, navigate to the sidebar menu on the left-hand side, and click on "Add to Website" from the menu.
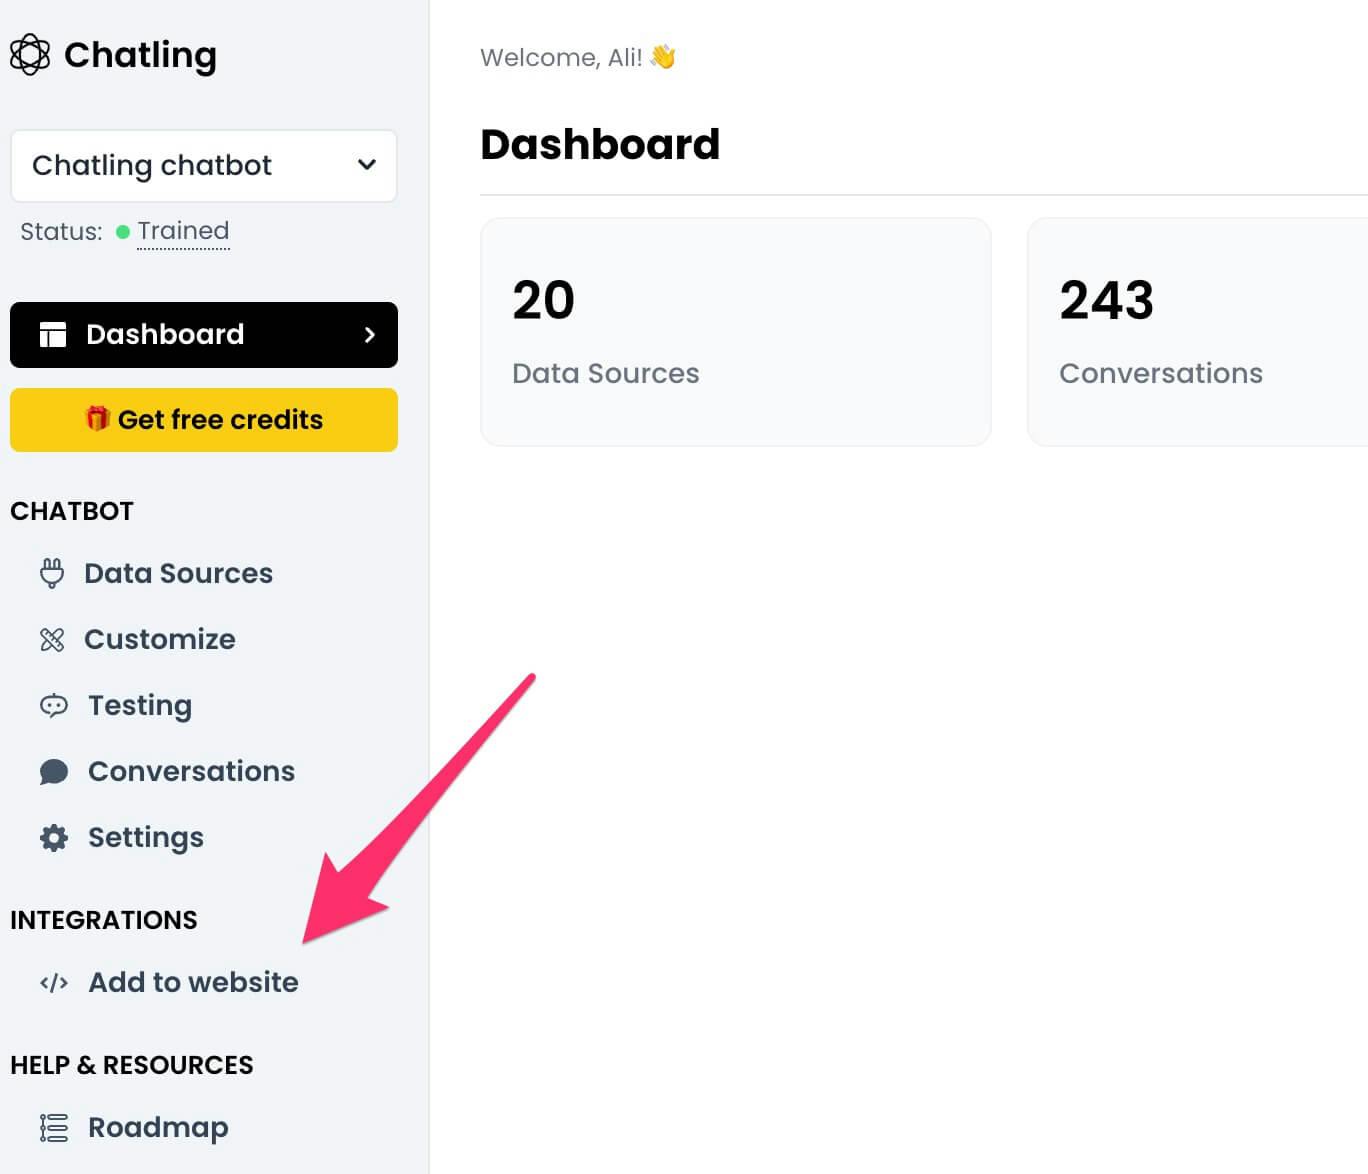
- If you have multiple chatbots, select the one you want to integrate with your WordPress site.
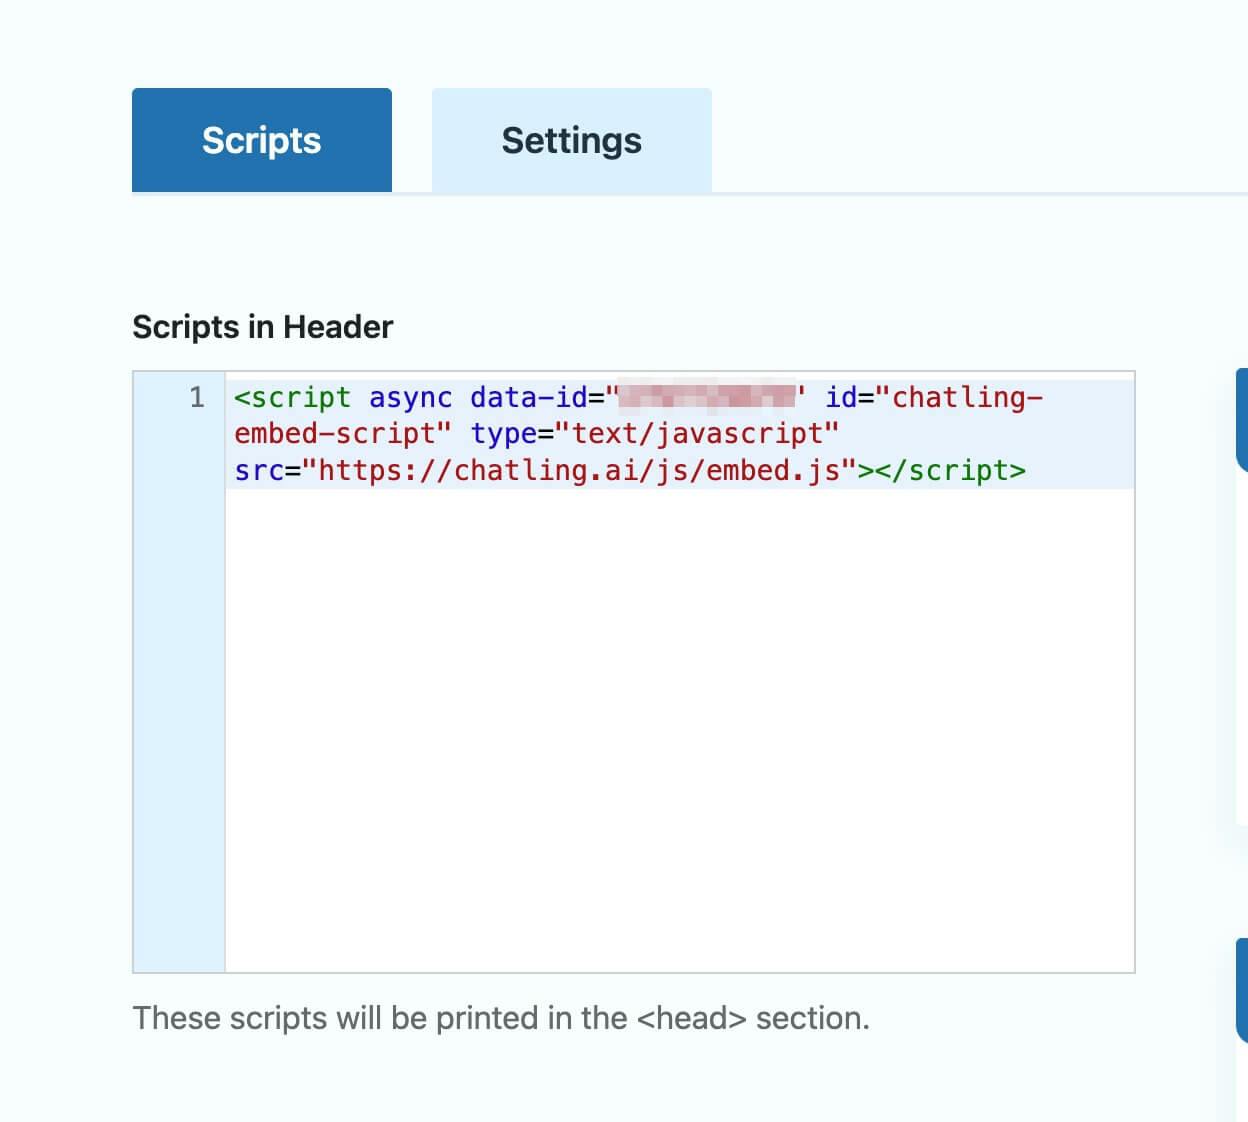
- A grey text box containing the chatbot embed code will appear.
- Click the "Copy Code" button below the box to ensure you copy the entire snippet correctly.
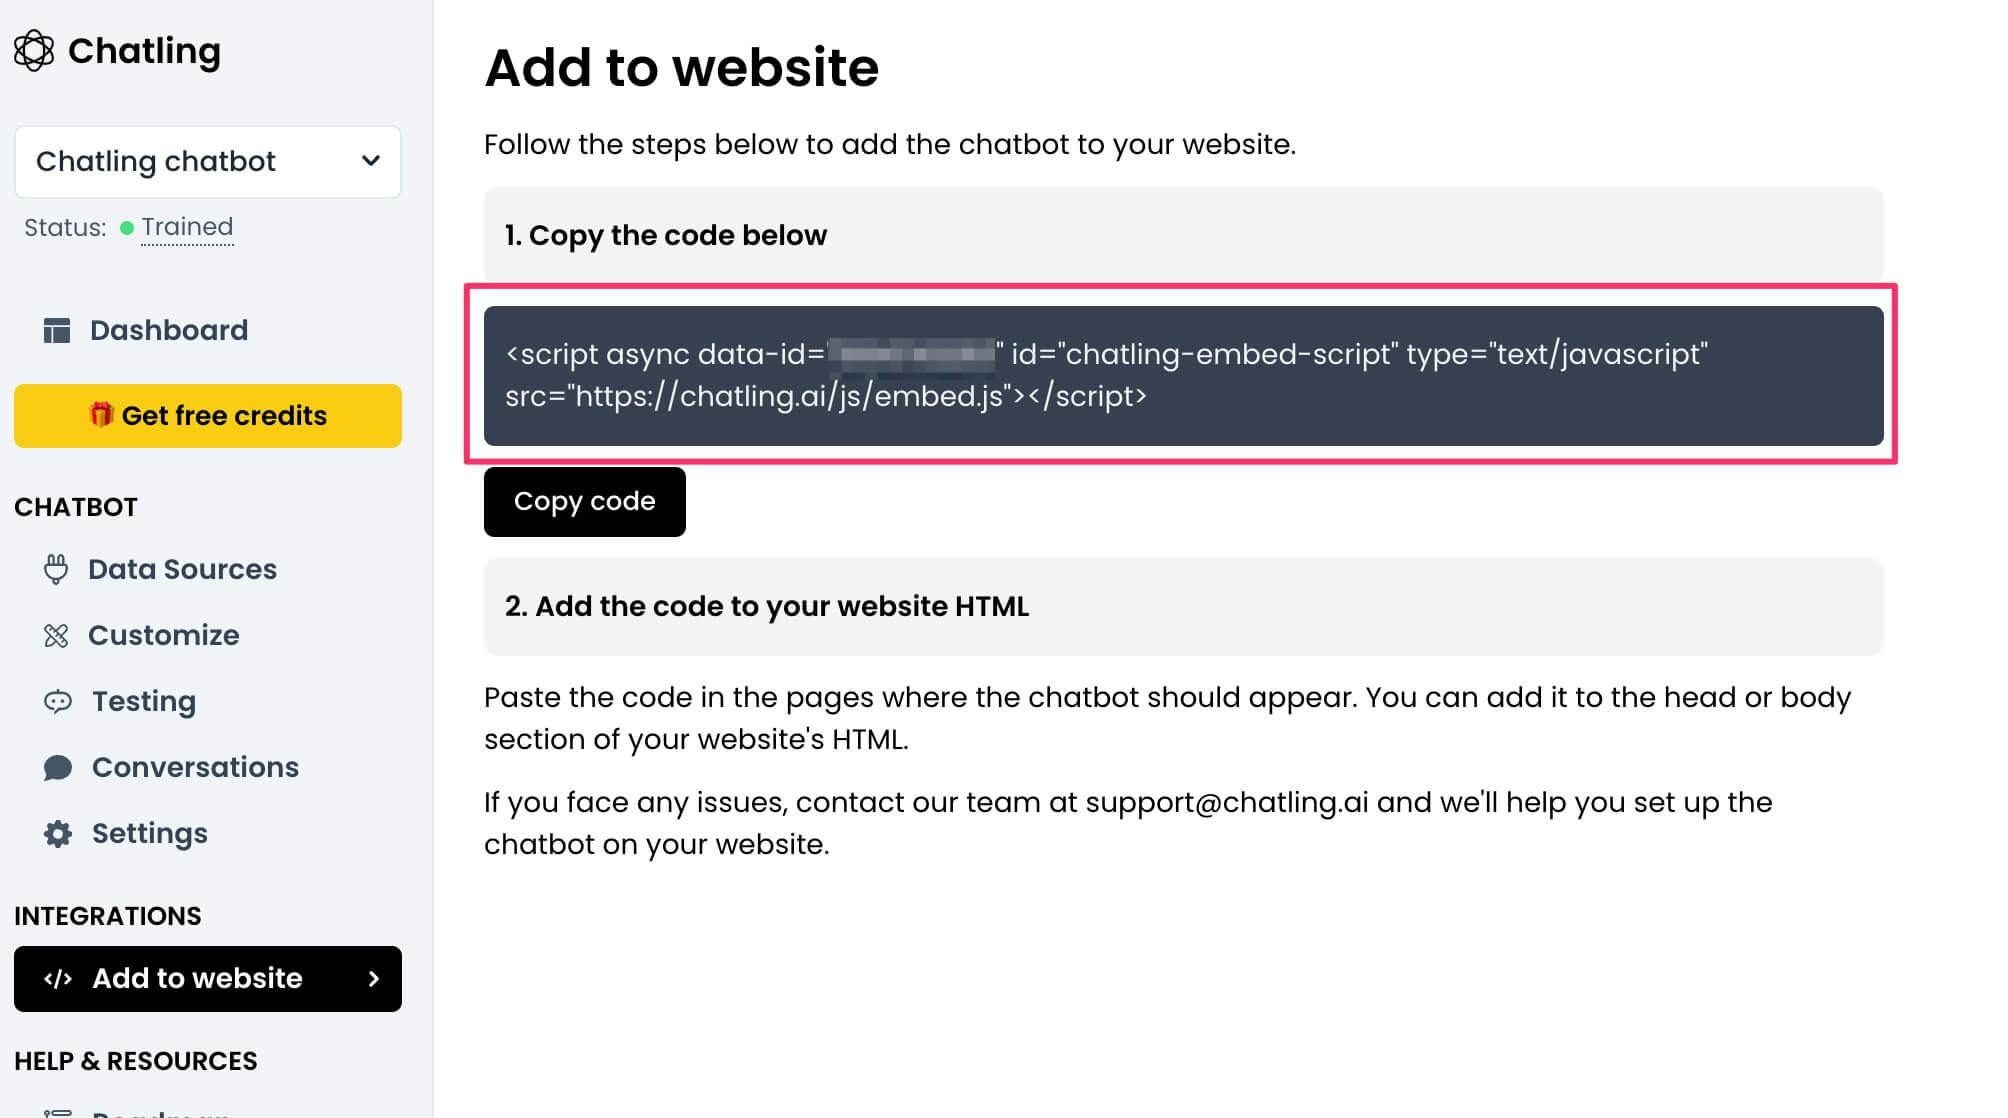
This embed code will be used in the next steps to add your chatbot to WordPress.
Step 2: Install the Insert Headers and Footers Plugin
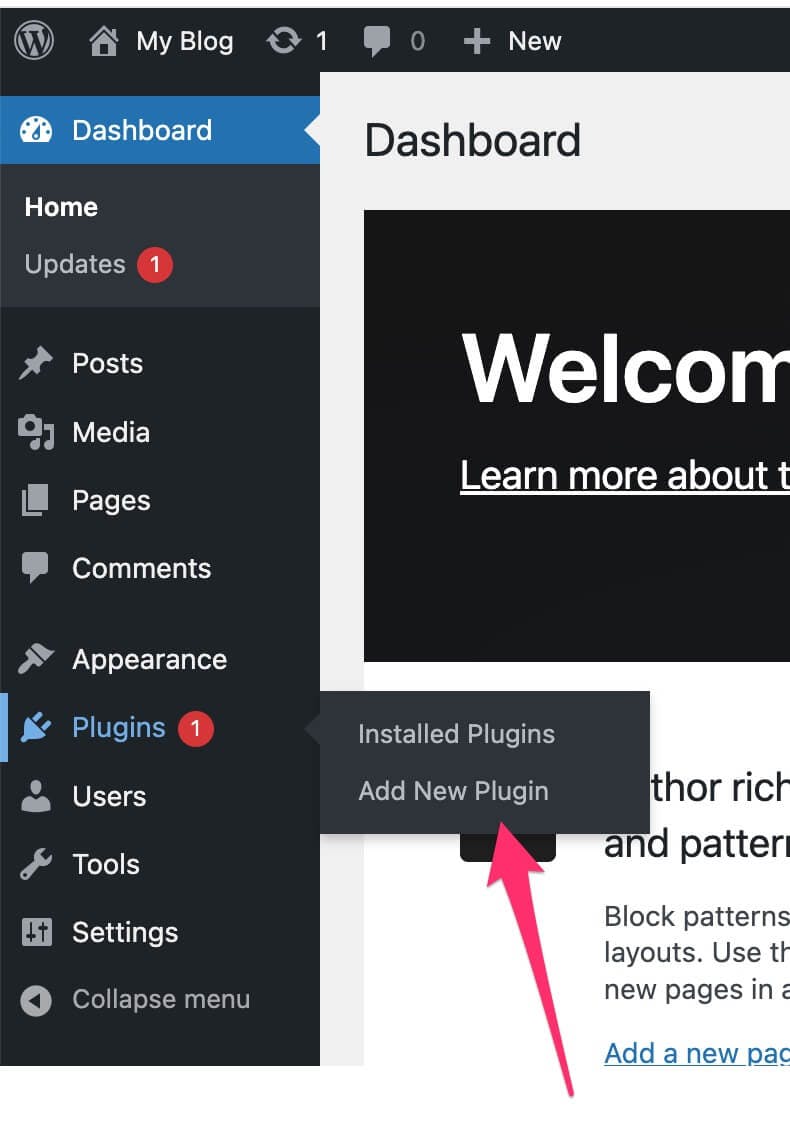
- Open your WordPress dashboard.
- In the left-hand menu, go to Plugins > Add New.
- In the search bar, type "Insert Headers and Footers" and look for the plugin by WPBrigade.
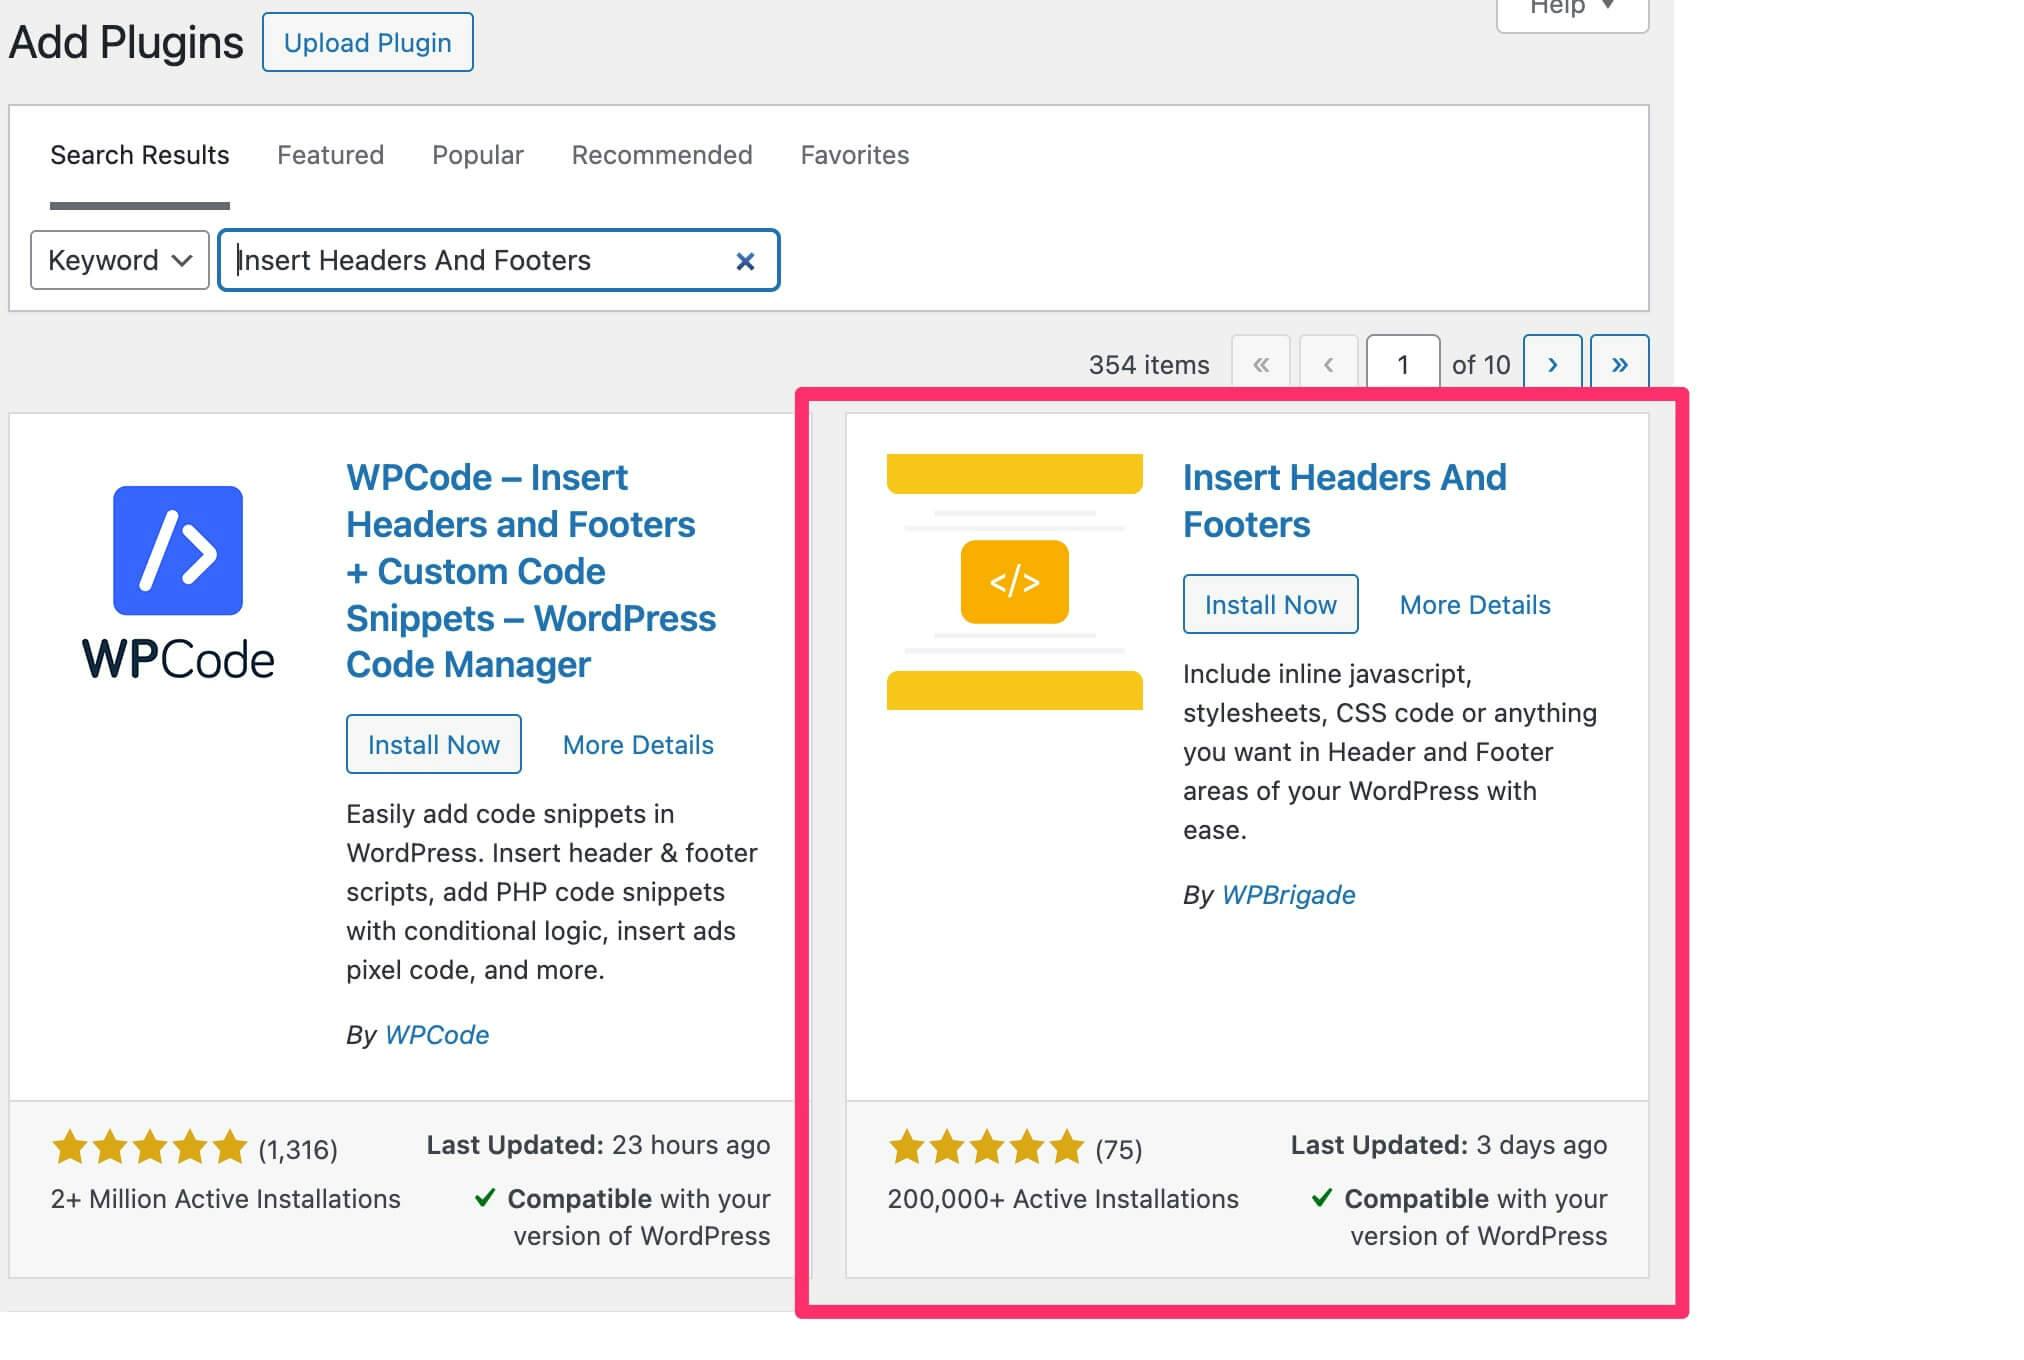
- Click Install Now and wait for the installation to complete.
- Once installed, click Activate to enable the plugin.
Step 3: Add the Chatbot Code to Your WordPress Site
- In the WordPress dashboard, go to Settings > WP Headers and Footers from the sidebar.
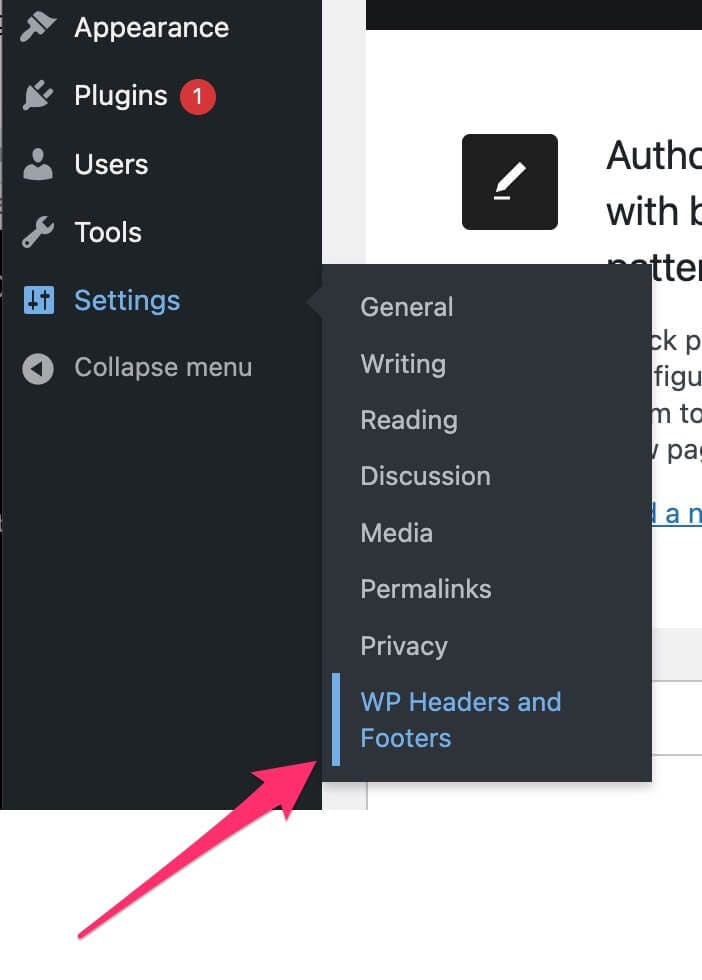
- Locate the Header section within the plugin settings.
- Paste the Chatling chatbot embed code you copied earlier into the header section.
- Click Save Changes to apply the update.
Your Chatling chatbot is now live on your WordPress website! It will automatically appear and interact with visitors.
Method 2: Using the Theme Editor (For Technical Users)
This method is for users comfortable editing WordPress theme files. Instead of using a plugin, you'll manually insert the chatbot code into your theme's header file.
Important Notes:
- This method only works with Classic WordPress Themes and is not compatible with block-based Full Site Editing (FSE) themes.
- Proceed with caution, modifying theme files incorrectly can break your website. If you’re unsure, consider using Method 1 instead.
- Back up your website before making changes to avoid potential issues.
Step 1: Get Your Chatbot Embed Code
Follow step 1 in Method 1 to access and copy your Chatling chatbot embed code. You’ll need this code for the next steps.
Step 2: Access the Theme File Editor
- Log in to your WordPress dashboard using your credentials.
- In the left-hand sidebar, navigate to Appearance > Theme File Editor.
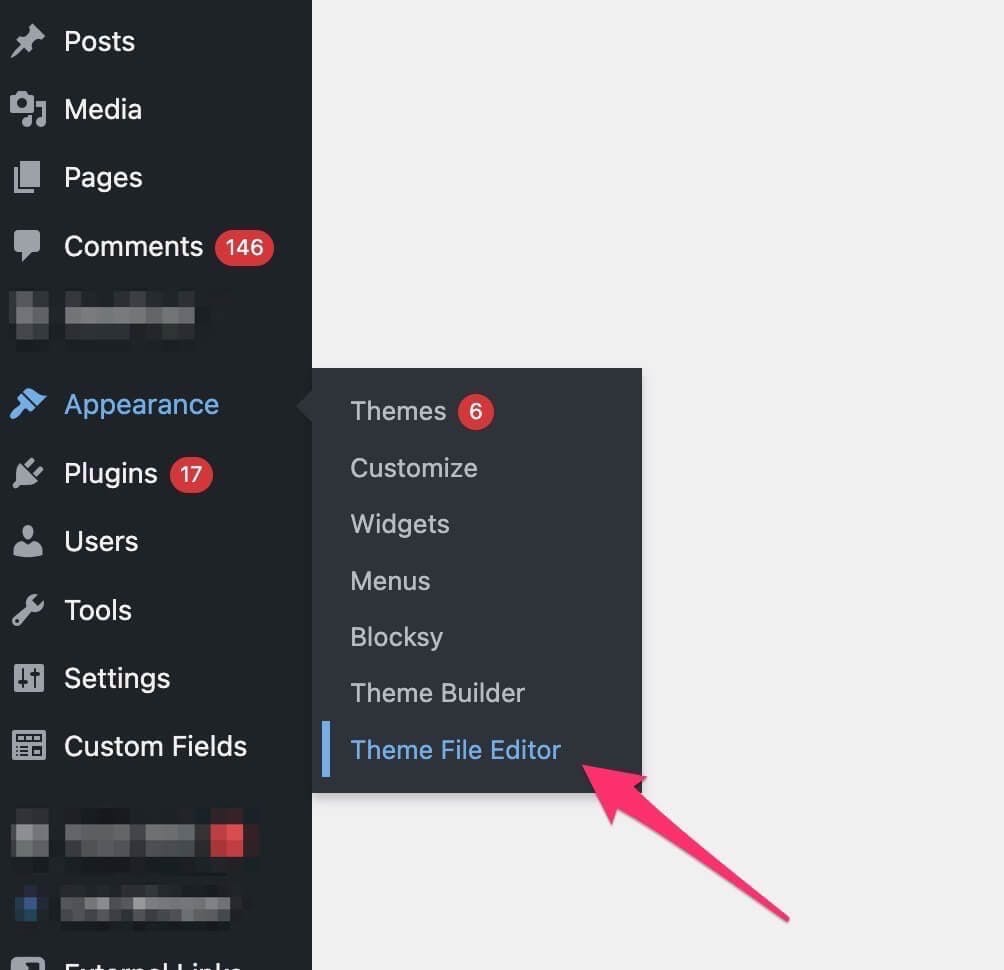
- If you don’t see the Theme File Editor option, you may be using an FSE (Full Site Editing) theme or have restricted permissions. Fix this before proceeding.
Step 3: Locate the "header.php" File
- On the right side of the Theme File Editor, you’ll see a list of theme files.
- Scroll down and locate the file named "Theme Header (header.php)".

- Click on header.php to open it. This file controls the <head> section of your website, where the chatbot script needs to be inserted.
Step 4: Insert the Chatbot Embed Code
- Within the header.php file, scroll down until you find the closing </head> tag.
- Paste the Chatling chatbot embed code just before the </head> tag.

Step 5: Save Your Changes
- Scroll down and click "Update File" to save your changes.
- Your Chatling chatbot is now live on your WordPress website!
How to Add Your Chatling Chatbot to Elementor
If your website is built using Elementor, you can integrate your Chatling chatbot into your WordPress website using Elementor’s Custom Code feature. This feature allows you to add HTML, JavaScript, or CSS code to your website and control where and when it runs.
Note: You must be on a paid Elementor plan to access the Custom Code feature.
Step 1: Get Your Chatbot Embed Code
Follow step 1 in Method 1 to access and copy your Chatling chatbot embed code. You’ll need this code for the next steps.
Step 2: Access the WordPress Dashboard
- Log in to your WordPress site using your credentials.
- In the WordPress sidebar, navigate to Elementor > Custom Code.

The Custom Code section allows you to add scripts such as Google Analytics, Facebook Pixel, and chatbot embed codes.
Step 3: Add a New Custom Code Snippet
- Click "Add New Custom Code" to create a new custom code snippet.

- A new window will open, allowing you to enter the details for your custom code.

Step 4: Fill in the Custom Code Details
You will be required to enter the following details:
- Title: Give your code snippet a meaningful title (e.g., "Chatling Chatbot").
- Location: Select where the chatbot code should be placed. Choose from:
- <head> – Runs the chatbot at the page level (recommended).
- <body> – Start – Runs the chatbot at the beginning of the page’s body.
- <body> – End – Runs the chatbot at the end of the page’s body.
- Priority: If multiple scripts are assigned to the same location, priority levels determine their order. Lower numbers (e.g., 1-10) indicate higher priority and will be executed first.
Step 5: Paste the Chatbot Embed Code
- Paste your Chatling chatbot embed code into the code editor
- Elementor’s built-in code checker will highlight any syntax errors. Ensure there are no mistakes before proceeding.
Step 6: Configure Display Conditions
- In the Publish block, locate Conditions and click Edit.

- Choose where you want the chatbot to appear:
- All Pages (default): The chatbot will be active site-wide.
- Specific Pages: Click Include and select the pages where the chatbot should be visible.

Step 7: Publish Your Chatbot
- Click "Publish" to activate your chatbot.

- If you’re not ready to go live, you can:
- Save as Draft to make changes later.
- Schedule activation for a future date and time.
Benefits of Chatbots for Wordpress
Integrating chatbots with your WordPress site brings numerous benefits, from enhanced support and availability to personalized user experiences and improved conversions.
Instant Support and Availability
Chatbots are available 24/7 and can provide instant support to your website visitors, ensuring they receive instant assistance anytime. This availability enhances customer satisfaction and helps capture potential leads or sales, even outside regular business hours.
Efficient and Scalable Customer Support
Chatbots automate customer support processes, handling common queries and providing instant responses. This helps reduce the load on your support team.
Personalized User Experiences
They can engage visitors in interactive conversations, guiding them through your website, providing personalized recommendations, and helping them find the information or products they need.
Improved Lead Generation and Conversion
With Chatling, you can add lead generation forms within the chatbot. This helps you capture valuable visitor information and generate leads directly on your WordPress site. Chatbots can also assist in the conversion process by providing product recommendations, addressing purchase concerns, and offering discounts or promotions.
Conclusion
Integrating a chatbot into your WordPress website enhances customer engagement, streamlines support, and improves user experience.
Whether using a plugin, the theme editor, or Elementor, Chatling makes chatbot integration quick and hassle-free. Follow the steps outlined in this guide to seamlessly add a chatbot to your site and provide instant, automated support to your visitors.